This post is about quickly and easily deploying an unsecured instance of NiFi and an unsecured instance of the NiFi Registry which uses the Cloud Source Repositories service as backend for the flow persistence provider.
The objective is to quickly deploy NiFi and the NiFi Registry, connect the two together, version the workflows in the Source Repositories, and be up and running quickly to start building workflows. This is not suitable for production deployment as we are not securing the instances (I’ll talk about that in another post).
Also this story is about a new feature in NiFi Registry 0.4.0 (NIFIREG-209) which allows the NiFi Registry to rebuild all the metadata from an existing Git repository of flows. It’s a very nice feature when you start and stop NiFi instances on the fly while also having access to your versioned flows very easily. Actually, using this feature, we could run the NiFi Registry in Google Cloud Run and have the production instances of NiFi just pulling the versions of the flows from the NiFi Registry exposed by Google Cloud Run. By doing that you would leverage the advantages of serverless. If you are interested by Google Cloud Run, you might be interested about this post for running NiFi workflows in Cloud Run.
Setup Source Repository
I start creating a fresh new project in my Google Cloud Platform console. I call this new project ‘nifi-registry’. Once the project is created, I go into Source Repositories. If it’s your first time, click on ‘Get started’ and ‘Create repository’.
Source Repositories is the Google Cloud offer to get free unlimited private Git repositories to organize your code in a way that works best for you (you can also mirror code from GitHub or Bitbucket repositories to get powerful code search, code browsing, and diagnostics capabilities). It also nicely integrates with CI/CD tools.
In my case, I create a new repository that I call ‘nifi-flow-repository’.
Let’s now setup the SSH key to allow access to the repository.
$ ssh-keygen -t rsa -b 4096 -m PEM -C "NiFi Registry"

Generating public/private rsa key pair.
Enter file in which to save the key (~/.ssh/id_rsa): ~/temp/id_rsa
Enter passphrase (empty for no passphrase):
Enter same passphrase again:
Your identification has been saved in ~/temp/id_rsa.
Your public key has been saved in ~/temp/id_rsa.pub.
The key fingerprint is:
SHA256:/hu6FZLvcvDigP4ixPFPEGzfpY1RHOoTRytjqYOoYHo NiFi Registry
The key's randomart image is:
+---[RSA 4096]----+
|   .     o+.     |
|    +   .+o.     |
|   . o .B*o      |
|  .....++*.      |
|.o.o..o S .      |
|+.o ...o.+ .     |
|o.E .o. .o+      |
| .... ..o=o.     |
|   ..o..+=+.     |
+----[SHA256]-----+


$ ls
id_rsa     id_rsa.pub
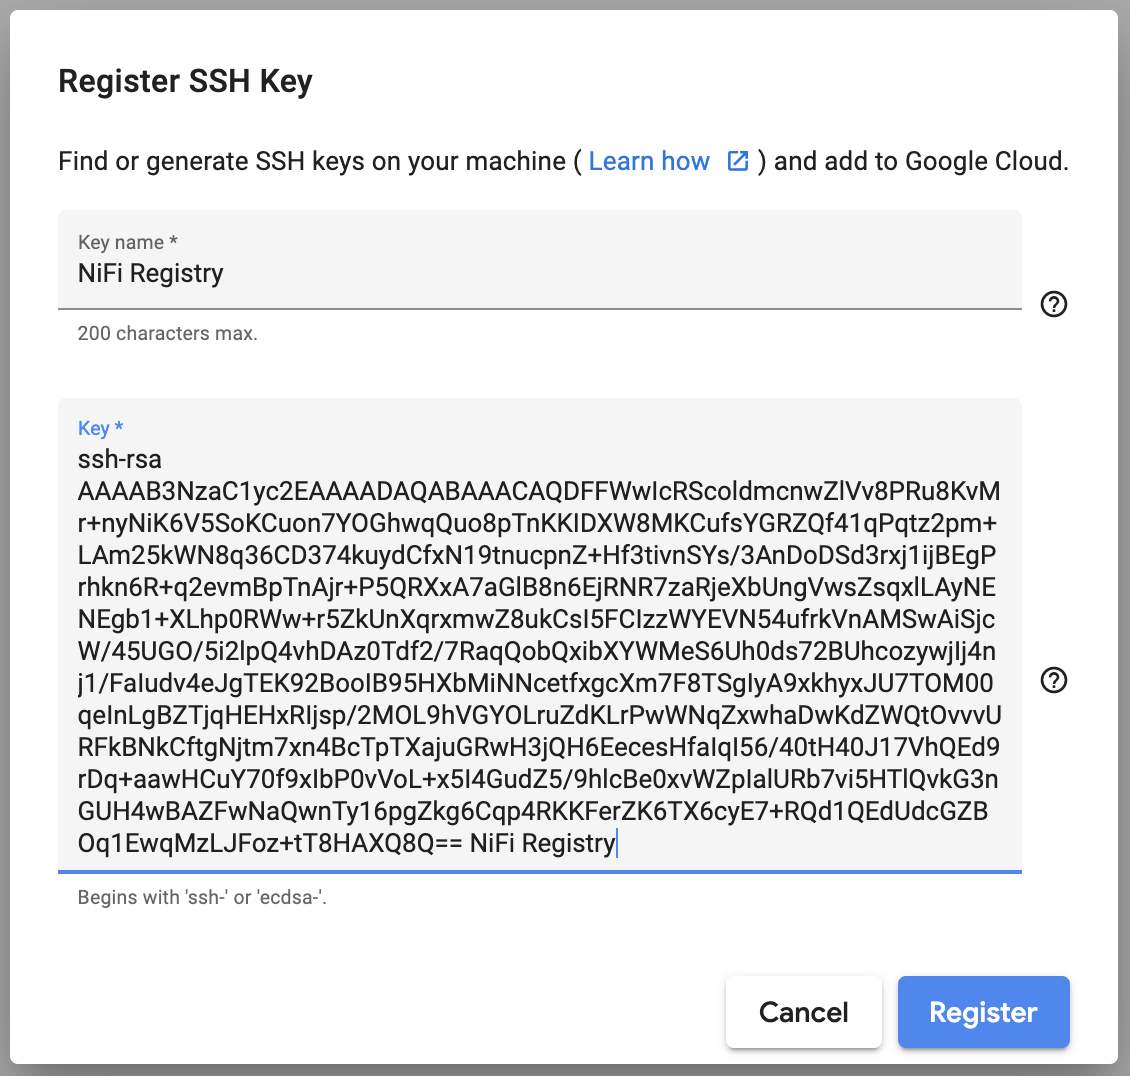
For this demo to work, we generate a PEM encoded key and we use an empty passphrase (again, this is not ideal for production). Once done, you can register the SSH key with Google Cloud (there is a link available after you created the repository). You just have to give a name to the key and copy the content of the generated id_rsa.pub file.

Start the NiFi Registry
We can now focus on starting the NiFi Registry. To be up and running very quickly, I’m going to rely on the Docker image provided by Apache NiFi and use it in a simple Compute Engine instance with Docker enabled.
In Compute Engine / Instance templates, you can create a new template. Here is my setup with the parameters I changed (adapt it to your needs):
- Name : nifi-registry
- Check “Deploy a container image to this VM instance”
- Container image : apache/nifi-registry
- Go into “Advanced container options”
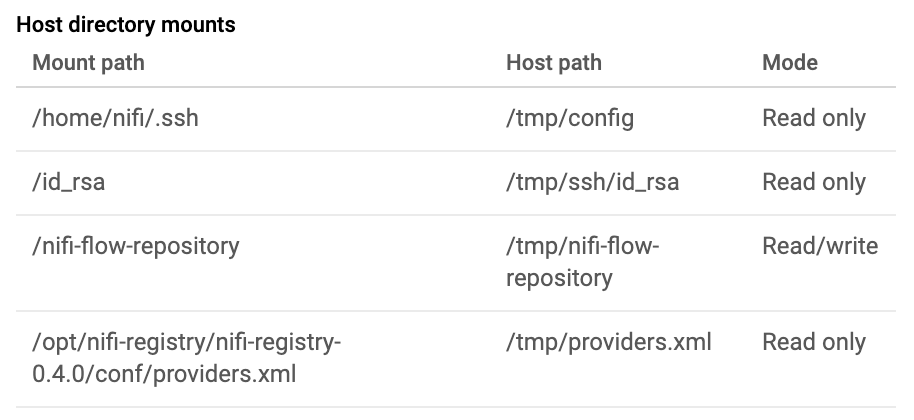
- In the volume mounts (use Directory as volume type) :
- Go into “Management, security, disks, networking, sole tenancy”
- Add the below startup script :
#! /bin/bash

# This script is used when starting a docker image based GCE instance
# of the NiFi Registry. It is intended to configure the NiFi Registry
# so that the persistence provider is the Google Cloud Source Repo.

# Docker volumes (directory type)
# /tmp/config => /home/nifi/.ssh - Read only
# /tmp/ssh/id_rsa => /id_rsa - Read only
# /tmp/nifi-flow-repository => /nifi-flow-repository - Read/Write
# /tmp/providers.xml => /opt/nifi-registry/nifi-registry-0.4.0/conf/providers.xml - Read only

# Note that 1000 is uid/gid for NiFi user/group in the Docker container

# create directory for SSH keys
mkdir /tmp/ssh

# private SSH key to authenticate againt the Google Cloud Source Repo
# its associated public key needs to be registered on Source Repo
# this is the content of the id_rsa file we generated, change it with yours!
touch /tmp/ssh/id_rsa && chmod 600 /tmp/ssh/id_rsa
cat <<EOF >> /tmp/ssh/id_rsa
-----BEGIN RSA PRIVATE KEY-----
MIIJJwIBAAKCAgEAxRVsCHEUnKJXZnJ8GZVb/D0bvCrzK/p8jYiuleUqCgrqJ+2D
hocKkLqPKU5yiiA11vDCgrn7GBkWUH+Naj6rc9qZviwJtuZFjfKt+gg9++JLsnQn
8TdfbZ7nKZ2fh397Yr50mLP9wJw6A0nd68Y9YowRID64ZJ+kfqtnr5gaU5wI6/j+
UEV8QO2hpQfJ+hI0TUe82kY3l21J4FcLGbKsZSwMjRDRIG9fly4adEVsPq+WZFJ1
6q8ZsGfLpArCORQiM81mBFTeeLn65FZwDEsAIko3Fv+OVBjv+YtpaUOL4QwM9E3X
9v+0WqkKG0MYm12FjHkulIdHbO9gVIXKM8sIyI+J49fxWiLnb+HiYExCvdgaKCAf
eR12zIjTXHrX8YHF5uxfE0oCMgPcZIcsSVO0zjNNKniJy4AWU46hxB8USI7Kf9jD
i/YVRmDi67mXSi6z8FjamccIWg8CnWVkLTr771ERZATZAn7YDY7Zu8Z+AXE6U12o
7hkcB940B+hHnHrB32iKiOev+NLR+NCde1YUBHfaw6vmmsBwrmO9H/cSGz9L1aC/
seSOBrnWef/YZXAXtMb1maSGpVEW+74uR05UL5Bt5xlB+MAQGRcDWkMJ08teqYGZ
IOgqqeESihXq2Suk1+nMhO/kUHdUBHVHXBmQTqtRMKjMyyRaM/rU/BwF0PECAwEA
AQKCAgBEFI1YMS/sl8vXUO77q3O2I6nkC3YrGAFUpwWgNCSciX6vwkVwAFAvBLMV
ksrQWiYfFNYscHCDt47Uyesg63swry/y2KWWb99RFKbyu0wmKdr6T1PI6NbnOEAk
SRXlqa0GxEHkyjB7C7yijC7EFpv34ei8mc36vIcHVtCfgMx/W2Rdl4rKUeaFS1FO
f+1OnGFC3OgpAp6Lia4+d/MWsnkJDflb9ZY4PSDpSXzL83tcAC3UhAPFySz3mjNn
fGvxaboS6P43utWLILvBivZz2Ki4L6juIeOZu2+SZY1JVpMIb7A96HIVGenEc6ZR
GpFyghDzIJ1to3mR8PL236ykzZs/iRbRGOvHSHNFiAmKMIXqeYe+Q6u/9mGVo68J
Vbw0PeTWaaPnnBM3iVi2d3STGsI6x2bTtosDyRS5YLNztj0Y8mOSWQz8JvnTcikM
lKBcSbA3K/ophzSyjk8sN65HqM1JQ0v/bK6w8TtZBLThPwcqRtbvYQBCQC7g74Oe
5KAuJRDTKDSxkLlD9AX0hdMIMIVKNd5h8Sx7vlX6DZ/5PdLT87eIS39mQlXNjE6W
kvGPte1YlTqWFECmxHlxvSEMB6txEzUrfEVLpTdKkpnygQFJfZdKzTiIsFiqKn9s
s6IAuzyHBJ6MMUdstZ8DMMnE/uXWU3ouUemSLcRiPMXi5AlZkQKCAQEA+EuQ75un
9PS/D6pCcOrZaodK0J2Xz4KX2VkuEJeP/KmDAFwcB0HzpQO6zQglIf8Sv9r3/g10
qk6pt5Y+gqBnpQOV/uUgN7U0lTMAnxx4l3RxXKZW3cqEYL326ouzRKDjz7TxYiWK
T+RT4QlK0jm7NfqZ8trqwi4dB4Nz5JA4MItoSinyWYzRfnaNH8jBxYmRyDGWQLsq
y2Dep6AZ2GPez473xl6TdwTc47UnDYbyuXdhK4yV+Jr9quYUkda+gFVlh7ZEK/vi
WsBoh0IjG07C4m8rNdxHnfplH9MIFo+I2u+hk6Ot4hpTc9b+Vj93FidSnboOEjDh
YD6MM1A8gVJdtQKCAQEAyzMJVHOAWq0F14h6vUY9m8lkw3KBZorfTsDD39kG3P7C
lh/VCCqk7Uz6drkPc6Gb/xp1LgCDhdxxNISos/92IINFwTmg1bQpaCBsfgkM+r2g
S87hUdCL3NCLwsrS67oQjalEAVu8TZ2obCZ48EgasiY48tq7SrQ7+tW7PSjnO5pv
pM661m5Gmp0/y7+0CkPg2JyGp4mwlYY5PgHUckpjwl7dHiDqTSYypOH0rX8i0UF7
NlOpWIFK1/o3K5YzenJwLIm9tdhG+AJ4ZXUOL+ihoUp+uyac33jCAsg34n2spEgi
F/5V8SZ/oYImBeqZJBSf/eOllAVQMHoNyU3F7SILzQKCAQAul6+I5wKresnnnKF/
IvLNhLnLT+dO70ijZpK4VliUpxKIHMC9s+iOjJafJuog6QaRrftfVxMPald6tdzh
EkygsH2TKVfUXFKTtNBnCyat9RHYuvYOBJS2uq788F4hgLd/IIszSawctdHvppi9
vkudI3uEEQSAj7qu0EINH+sLYP2e/SQXHc+qFYEB9+A0u0357SQu3XB4XaMqfWac
LpF/DWr9dH3jlawFpta/ORWPLBG15Fm4Hw1+5lHx1ARHfL7iqpc8UbX2Jaj3yLdh
xnPXndjT8JQX1wbm4+jeouyheNovJEXa6enDERMFCD/GjnZ4VpORYk7IirQwZNwV
wGkJAoIBACYlU5gOAseC+bjHfzsvB3vKZ+clBNPKODehimPoaxhrnv3txeE9mC6Q
J+jHvvXXHeDbB6p2IDqt8naIfN8lkvhxjFPEzMOxiaBpjdRvQIeFt6Tjlnr0an0u
jT4pM0VbbaYaY5DZttTfRvHemw+IibJt6Hz2wPg6M5RYMUk+94HB8TmAMaT1mL2H
zaUjPNo8eeZQJBsphwPa6b4RO9+kxWuEwX/ZcALBq/o2DOfRGSktYMMHG6BozTMU
Xu0IymsvNo214e5URqZiWFW7jslBo64SvQ3HJuXw1oMNMSiMrS8992CHt3yI3Kbm
NtsfelZCpPJVnQzXnoErOJFUz1Y/8PUCggEASI2Uky/TDLCU5Inm2hN1zzozF/kh
pvKks4Kd93BSiMWDHg07HtfkGPBINQdwGScLuTK63uHEuVTB1e1VM+Kd+FqoddoA
xEfdFKoDMgyhE2KNg9iiePbkeXzCCY9yFD2xQ+zfMdqd/755Fg356IfETSx59WzO
vNTQShrwj5zOE1H3wl+YYsAWA1AiHslzwVp5pO26KhQLMO90q5j2g7gJEWOfhUDi
bkhJu3rXdJpiYOCngy0vKiSFYrvFfYh4hZ4+mL/TzWIuJtC0zmSetk1VwOYBkwJZ
Uo1bAaMdFJMC/QAWiJv95jGuusV39nT7pxd93sW1Iiv9OXnsxj8OeShEVg==
-----END RSA PRIVATE KEY-----
EOF

# clone the Google Cloud Source Repository
cd /tmp
ssh-agent bash -c 'ssh-add /tmp/ssh/id_rsa; git clone ssh://[email protected]@source.developers.google.com:2022/p/nifi-registry-245014/r/nifi-flow-repository'
chmod 755 /tmp/nifi-flow-repository
chown -R 1000:1000 /tmp/nifi-flow-repository

# Create the providers configuration for the NiFi Registry
# no user/password because we use SSH authentication
cat <<EOF > /tmp/providers.xml
<providers>
  <flowPersistenceProvider>
    <class>org.apache.nifi.registry.provider.flow.git.GitFlowPersistenceProvider</class>
    <property name="Flow Storage Directory">/nifi-flow-repository</property>
    <property name="Remote To Push">origin</property>
    <property name="Remote Access User"></property>
    <property name="Remote Access Password"></property>
  </flowPersistenceProvider>
  <extensionBundlePersistenceProvider>
    <class>org.apache.nifi.registry.provider.extension.FileSystemBundlePersistenceProvider</class>
    <property name="Extension Bundle Storage Directory">./extension_bundles</property>
  </extensionBundlePersistenceProvider>
</providers>
EOF
chown 1000:1000 /tmp/providers.xml

# .ssh/config and .ssh/known_hosts files
mkdir /tmp/config
cat <<EOF >> /tmp/config/config
Host source.developers.google.com
  HostName source.developers.google.com
  IdentityFile /id_rsa
EOF
ssh-keyscan -p 2022 source.developers.google.com >> /tmp/config/known_hosts
chown -R 1000:1000 /tmp/config

# change chmod on the private key to allow access to 'nifi' user inside container
chown 1000:1000 /tmp/ssh/id_rsa
Note 1 — we are using templates to get up and running very quickly each time you want to start a new instance with the same configuration.
Note 2 — the above approach is not recommended as we are copying/pasting the private key in the startup script but this is due to the restrictions coming with the Container Optimized OS used for this demo. In a better world, we would use Cloud Build to have our own NiFi Registry image and use it instead. Or we could deploy the public image on Google Kubernetes Engine and use secrets.
Once your template is created you can open it and click “Create VM”:

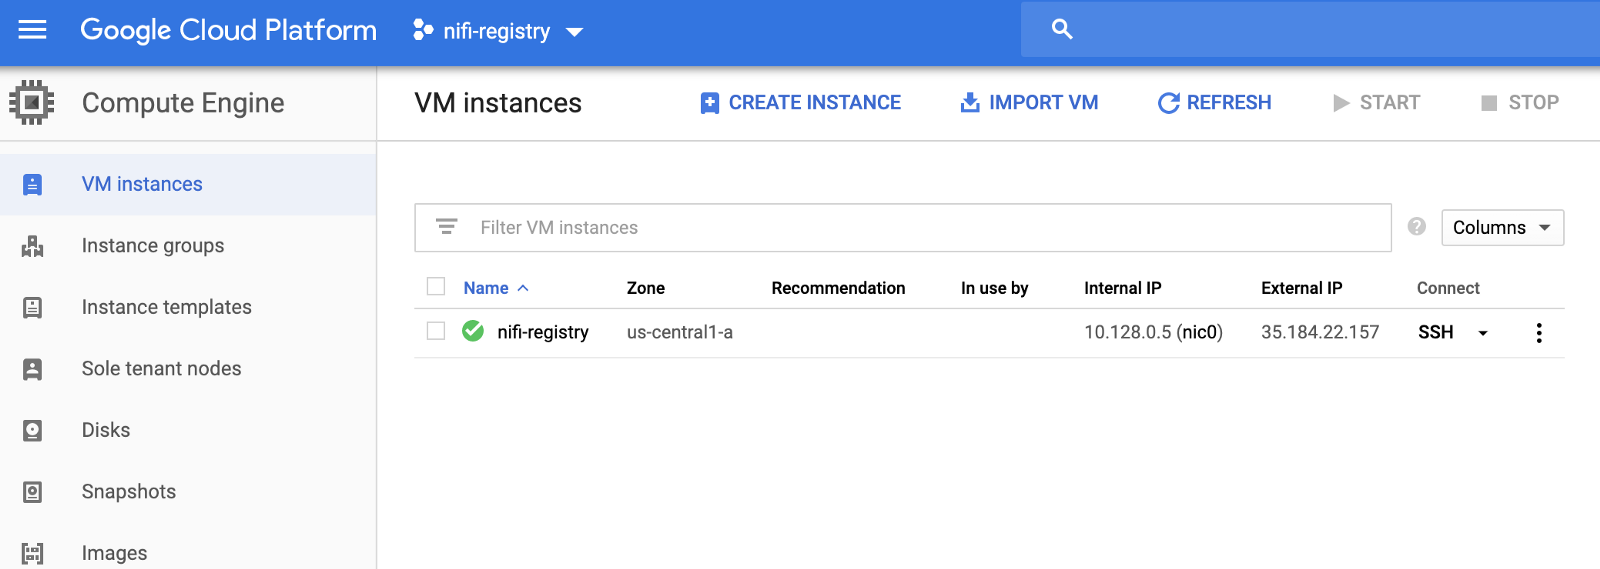
Then you can give a name to your instance (let’s say ‘nifi-registry’) and start it. You should have an instance up and running:
After configuring the proper Firewall rule to allow access from your personal network to the instance on the port 18080, you should be able to access the NiFi Registry at http://
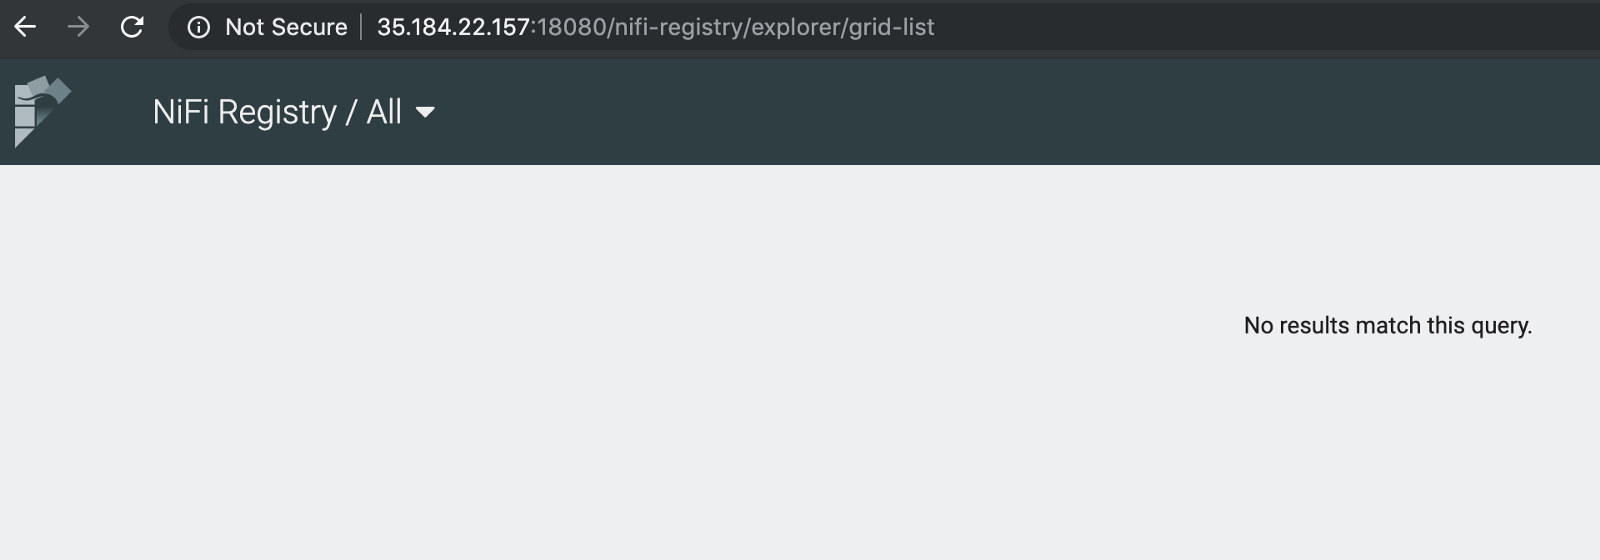
You can go in Settings (top right) and create a new bucket:
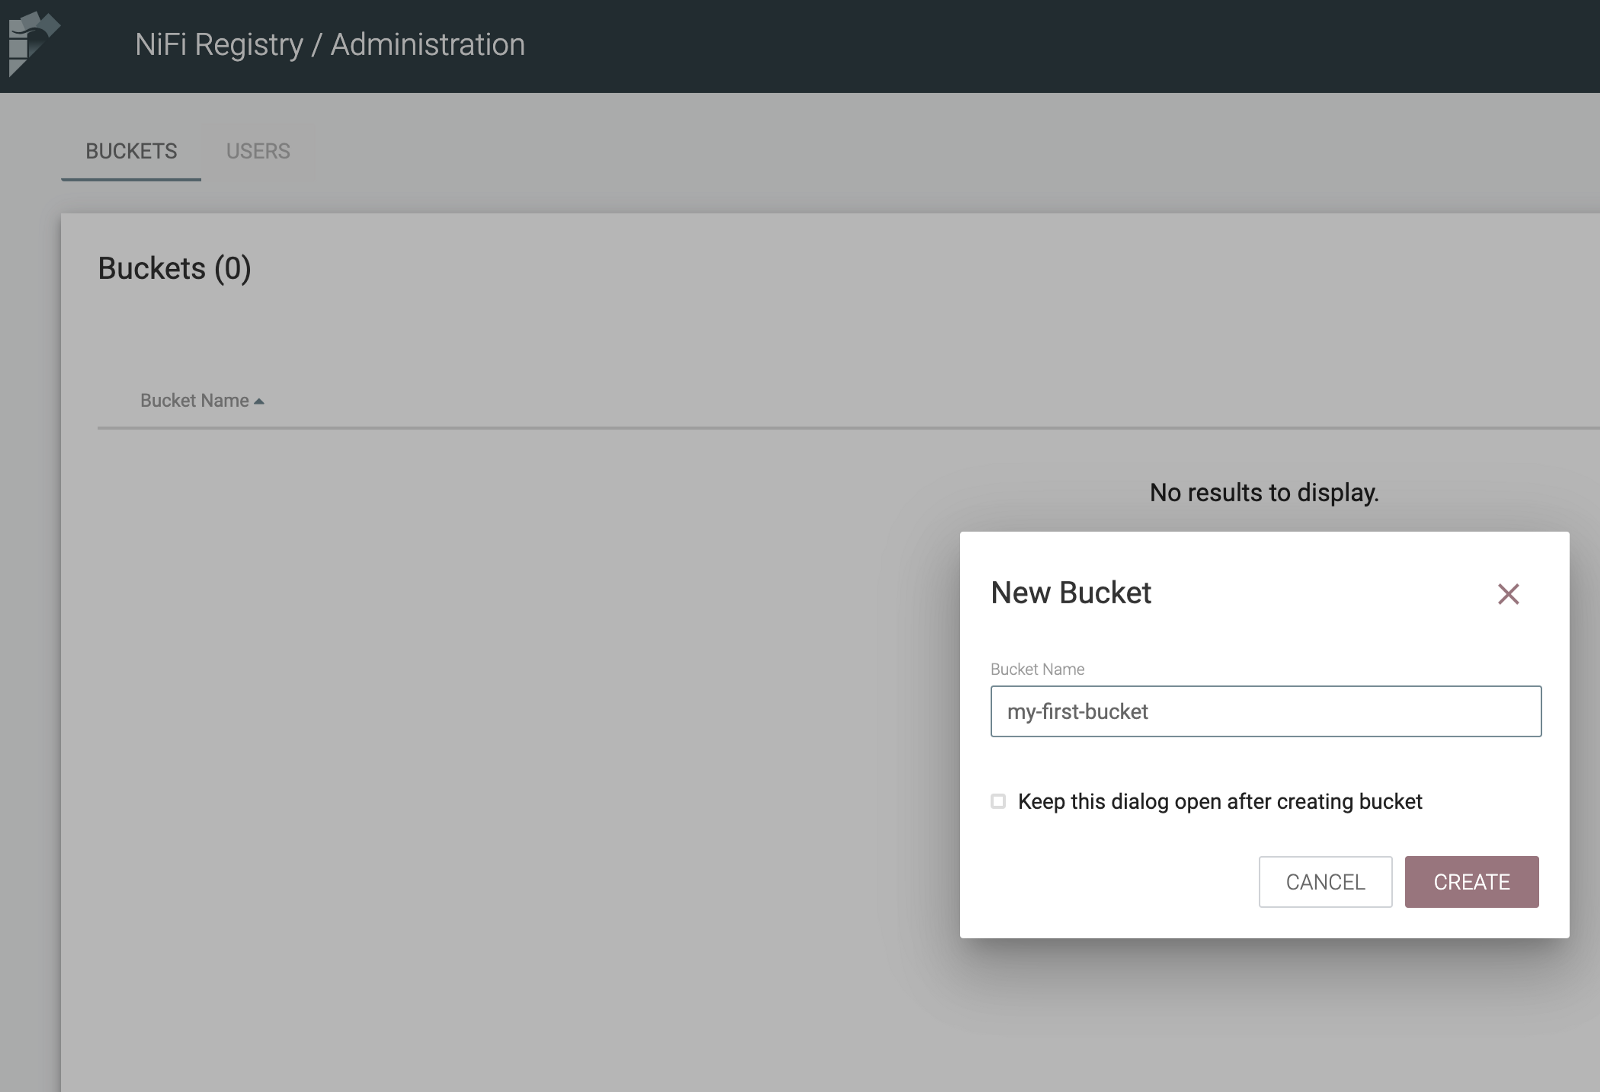
You now have a NiFi Registry up and running and you have initialized you first bucket. We can now deploy a NiFi instance, connect it with the Registry and create out first workflow.
Start a standalone NiFi instance
It’s very easy! Just go in Compute Engine / VM instances and click “Create instance”. Then just give a proper name to your instance and configure it to use the NiFi Docker image:
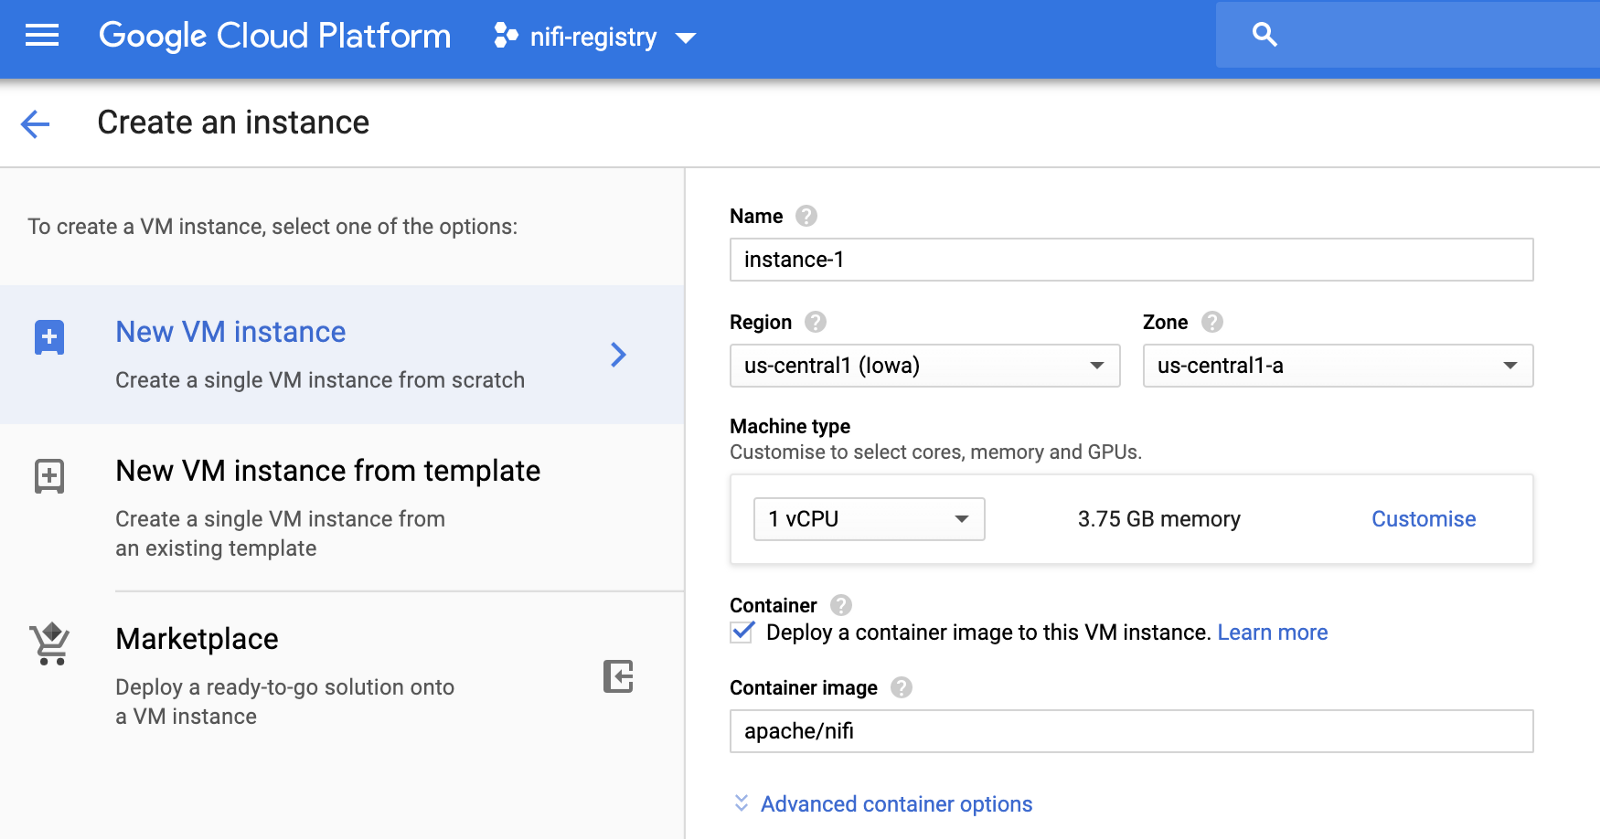
Start your VM and wait for few minutes. After configuring the Firewall rule to allow access from your personal network, you should be able to access NiFi on port 8080:
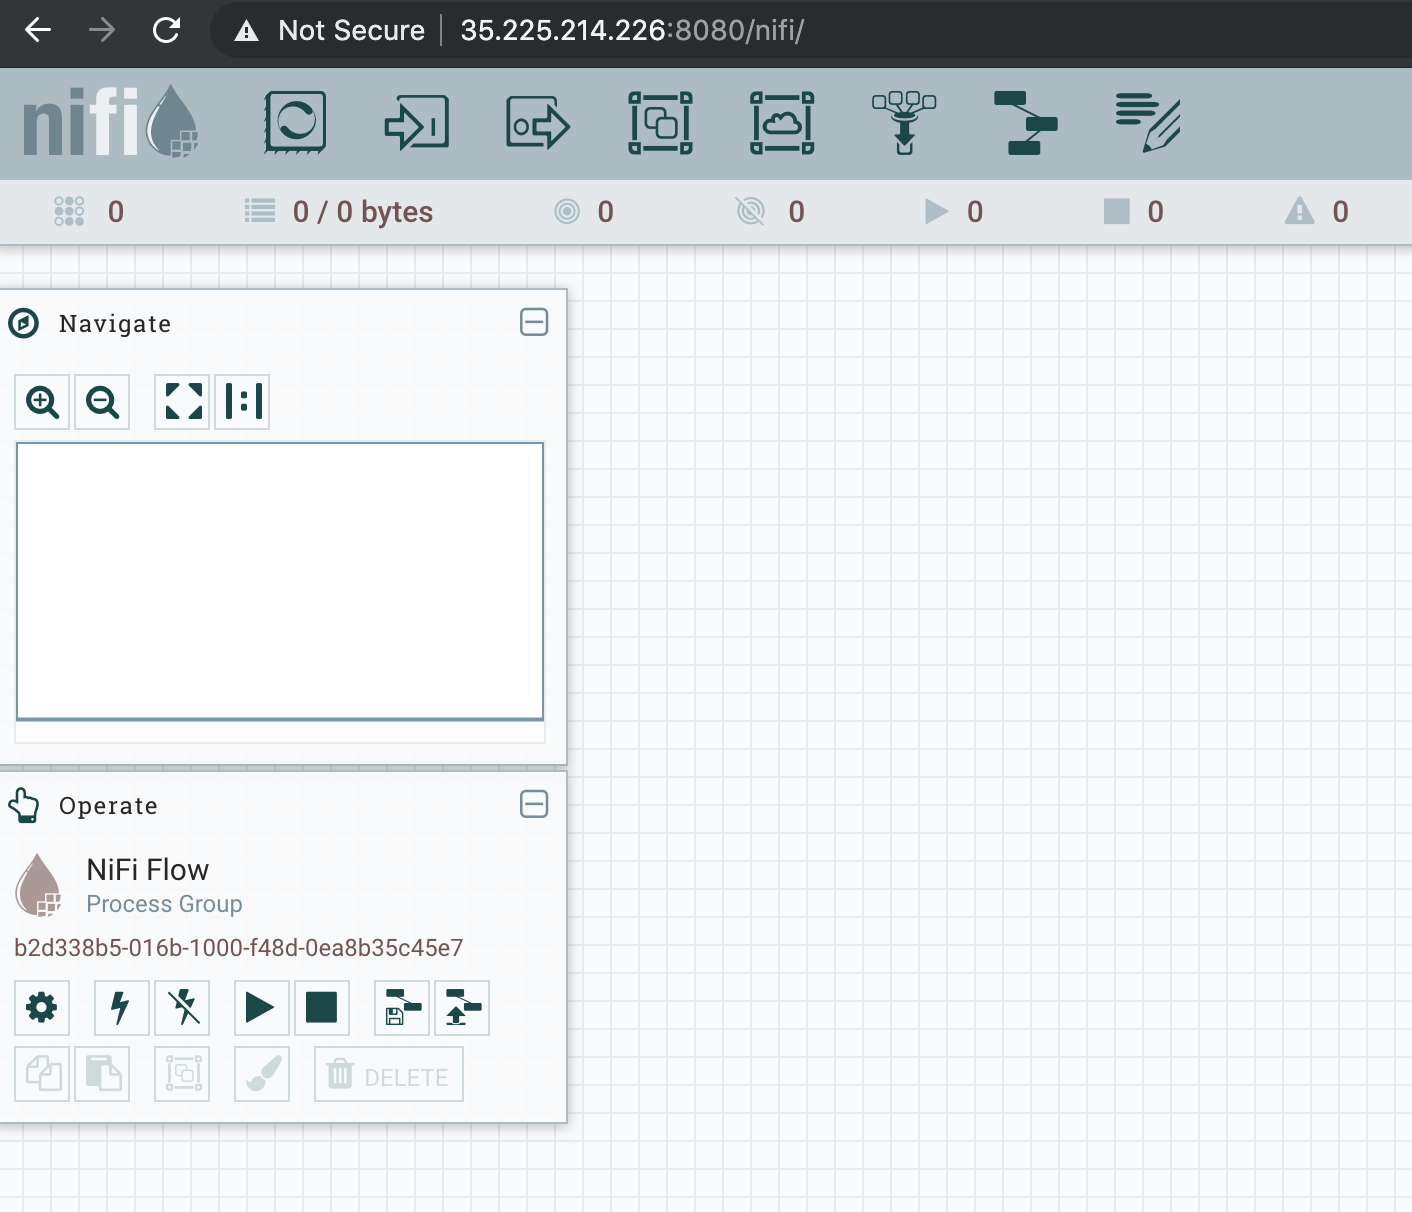
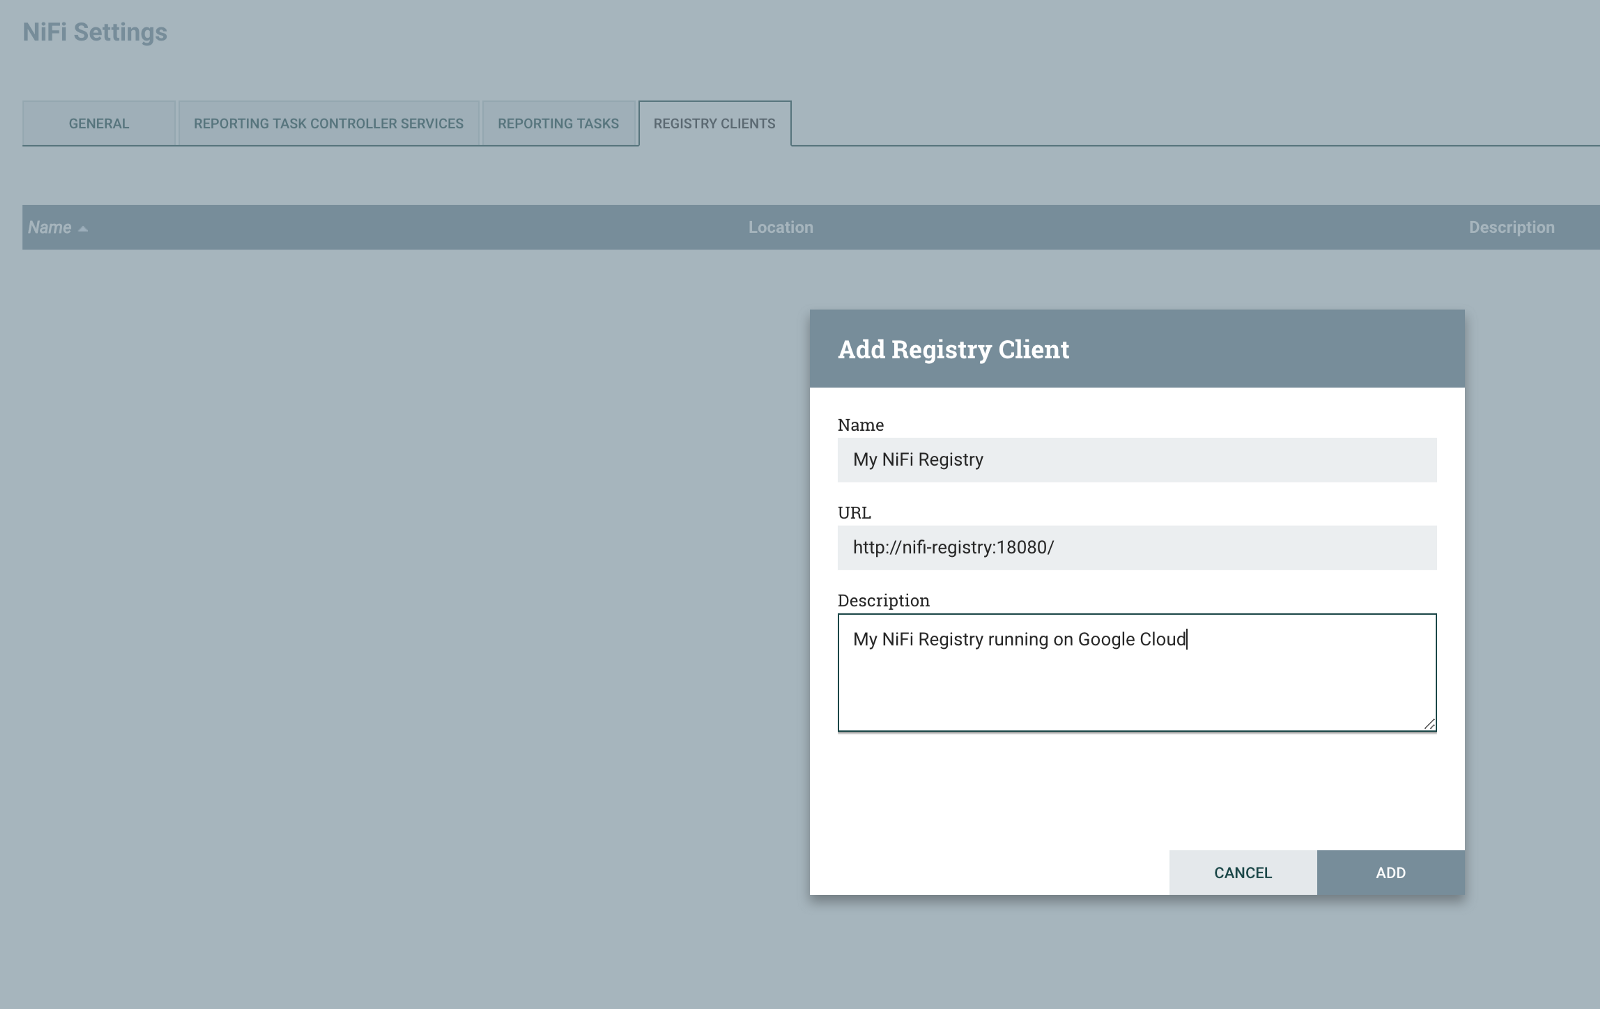
Go into the top-right hamburger menu and go into Controller Settings. Then go into the Registry Clients tab and click the + button to configure your registry:
You can now add a Process Group into the canvas, right click on it and start versioning:
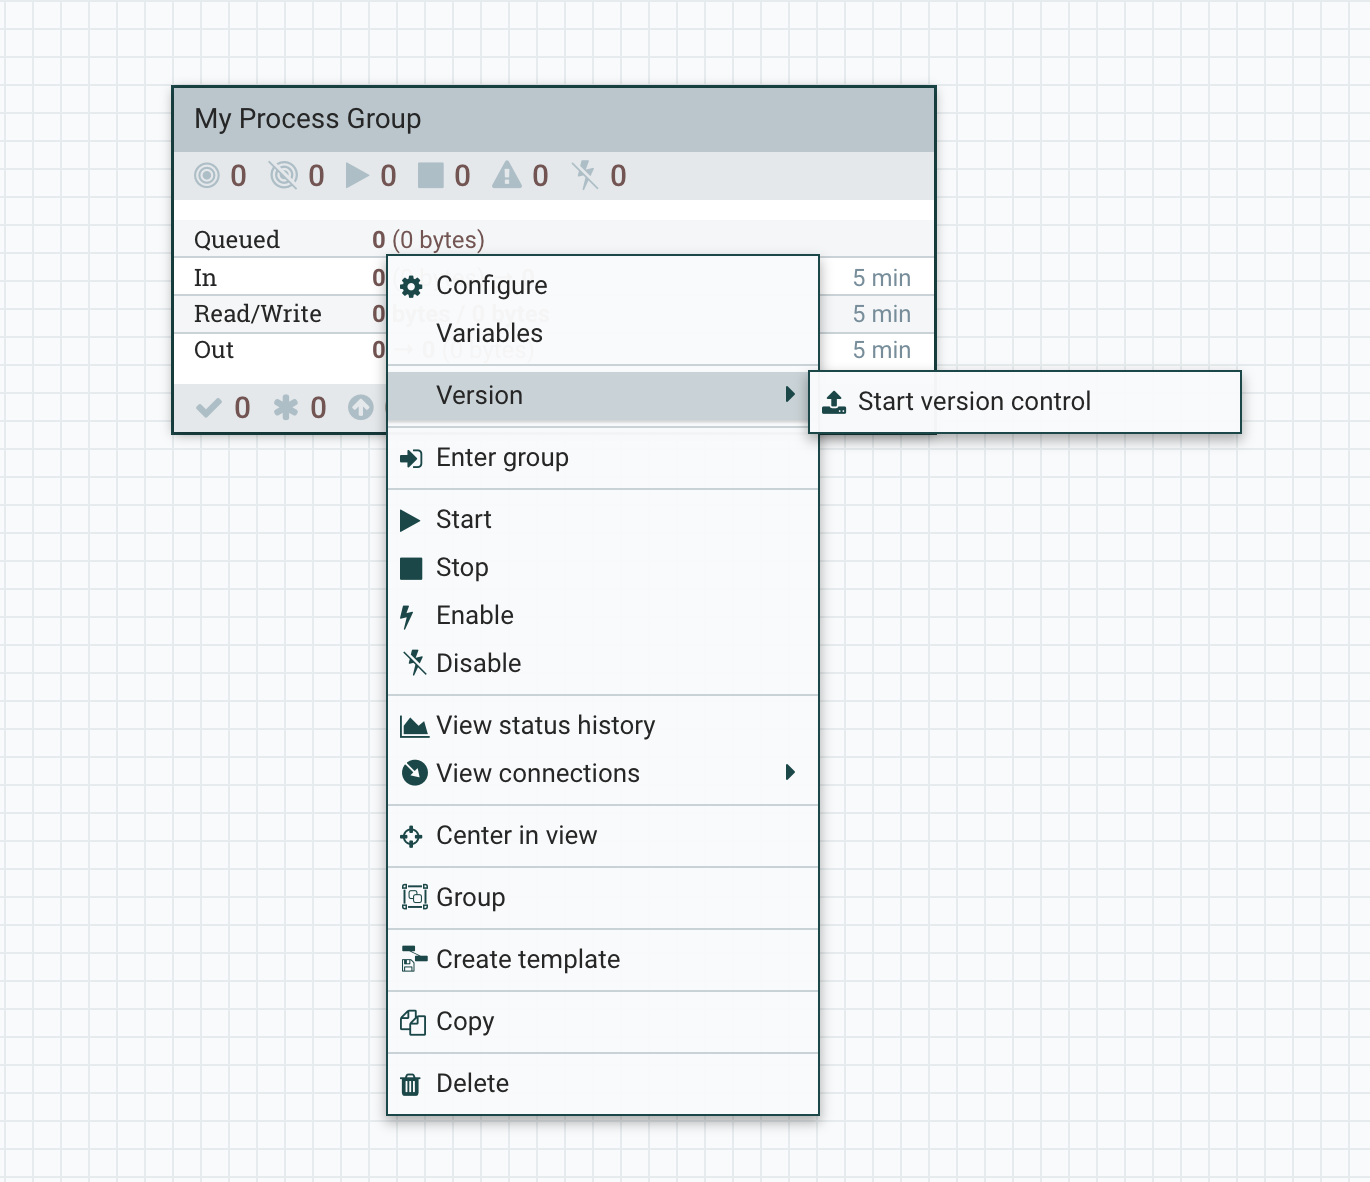
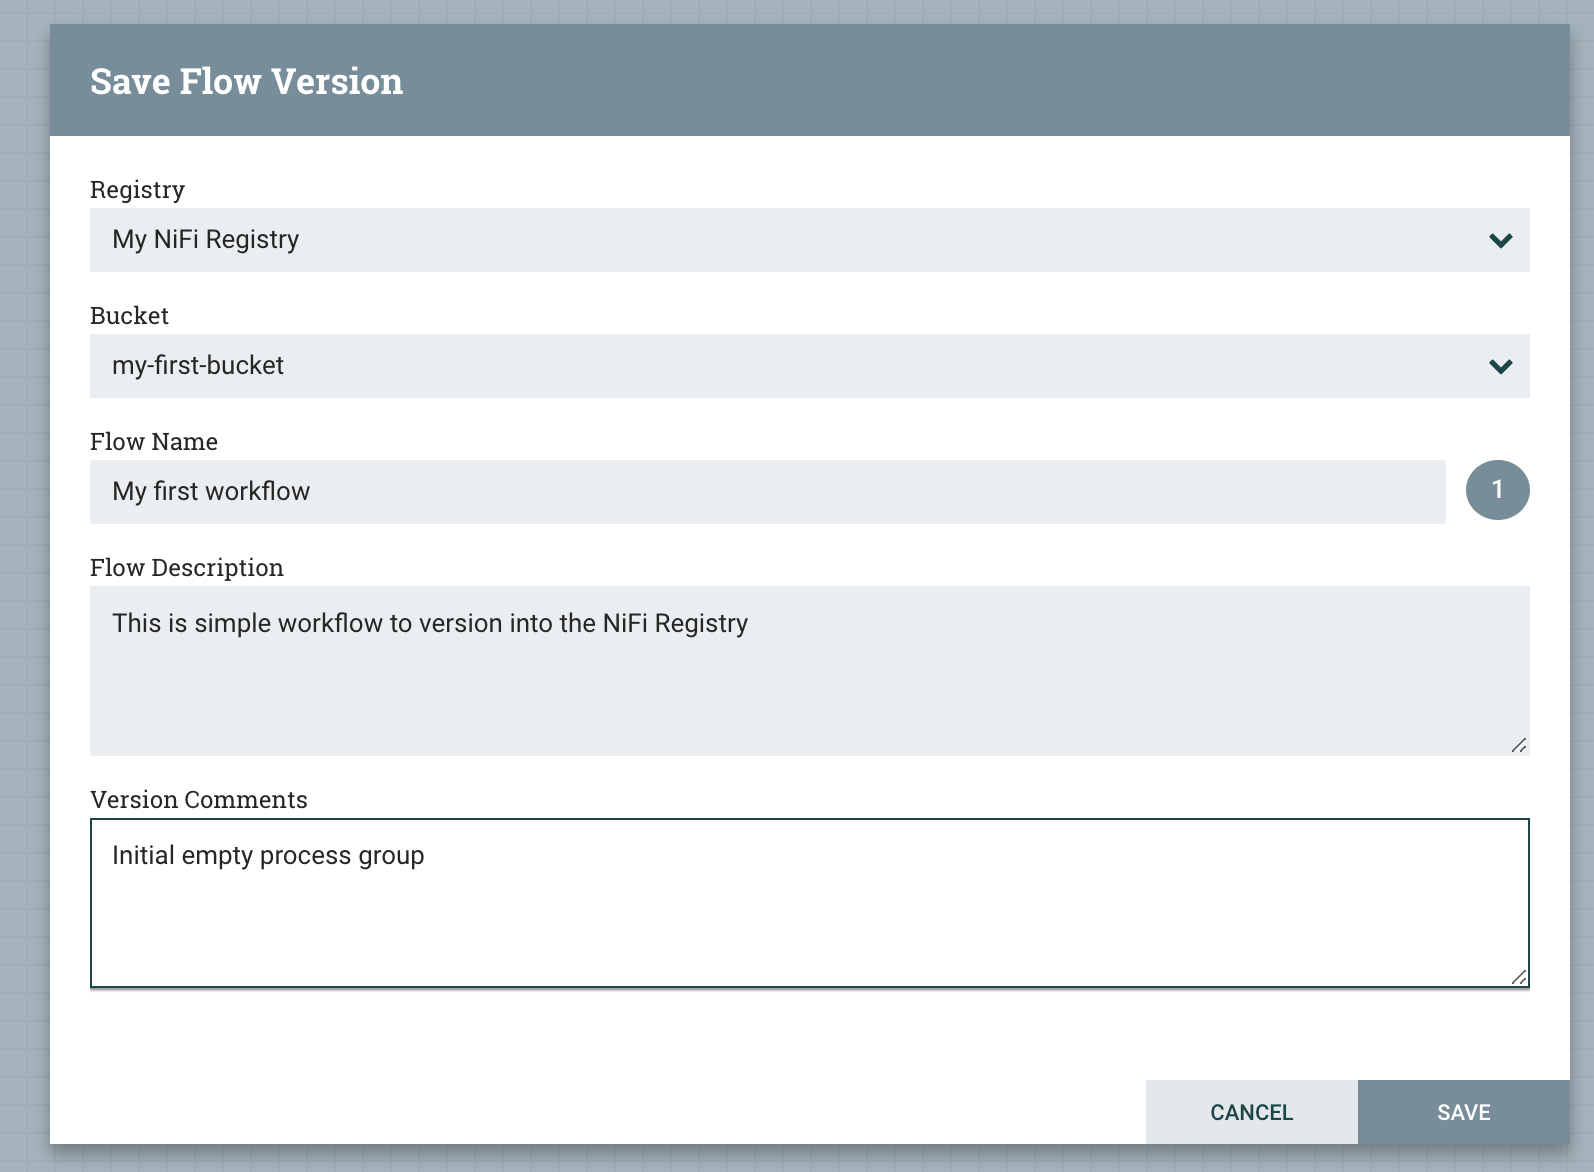
You will notice that we can see the bucket we created in the registry. We can give a name to our workflow, a description, and a commit for this version.
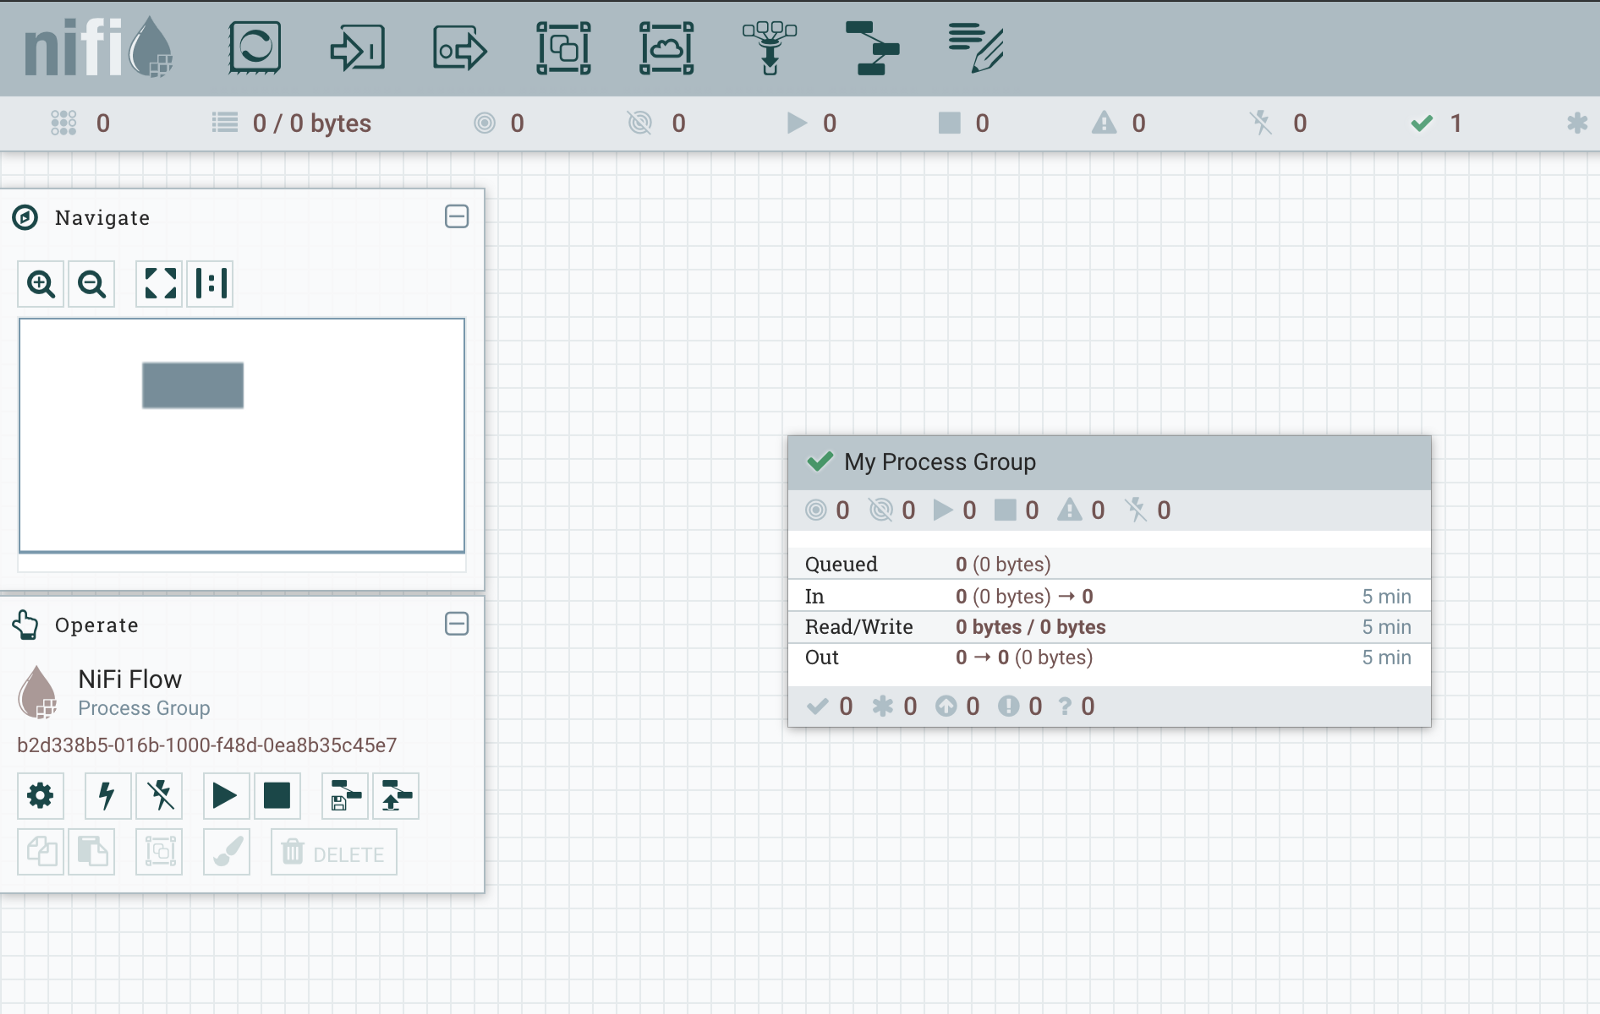
Once we click save, we have the confirmation that the workflow has been correctly versioned:
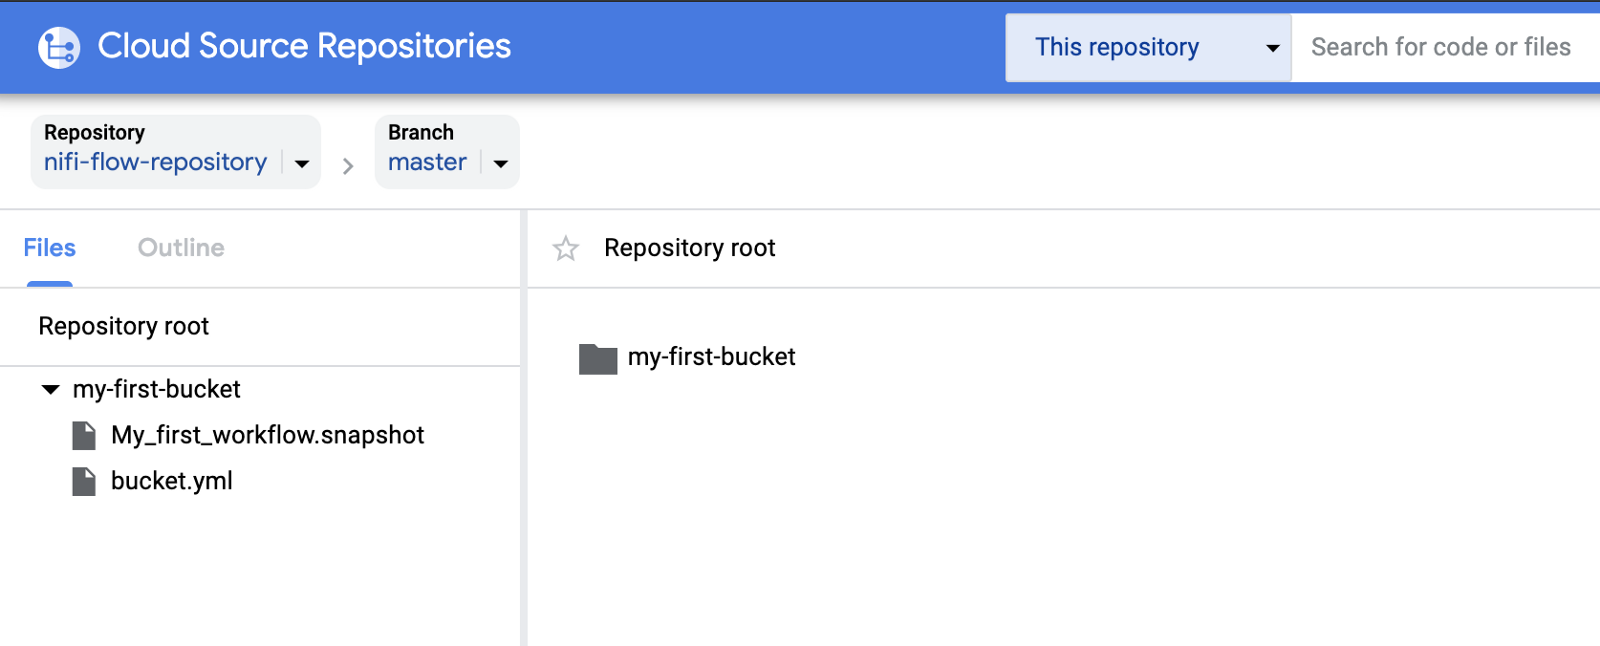
We can check in our Cloud Source Repository that we do have data:
That’s it. You can now create a more complex workflow and commit the new version into the Registry, this will be saved into your repository. Even better, if you kill your NiFi Registry instance, and start a new one, you will be able to keep working and pull all the workflows you previously stored in the repository — all the metadata will be generated from the repository data at startup.
There is much more to come about NiFi on Google Cloud, stay tuned! Thanks for reading and feel free to comment and/or ask questions.